UNiXIaC
Ansible Semaphore Documentation
Overview
-
Effortless Automation: Semaphore, a graphical user interface for Ansible, simplifies infrastructure provisioning. It enables the automatic creation and configuration of virtual machines, like AWS EC2 instances, through a user-friendly interface.
-
On-Demand Infrastructure: Semaphore and Ansible empower you to manage EC2 instances efficiently. You can easily spin up instances for testing purposes and terminate them directly from the AWS portal once testing is complete. This eliminates the need to maintain unnecessary instances, reducing costs and optimizing resource utilization.
AWS Instance Creation
-
After logging in, navigate to the ‘Task Templates’ in the nav bar on the left-hand side.

-
Along the top you will see a list of OS versions to filter tasks by OS. There is also a ‘DB’ filter for databases and other services.

-
To start a task, click the ‘RUN’ button on the right side of the row for the Task you want to execute.

- You will now see a pop-up window showing 2 entry fields.
- VM Count - Number of duplicate EC2 instances to create (default=1).
- AWS Region - Region where you want the EC2 instance to be created. 1=EMEA 2=AMS 3=APJ (default=1)
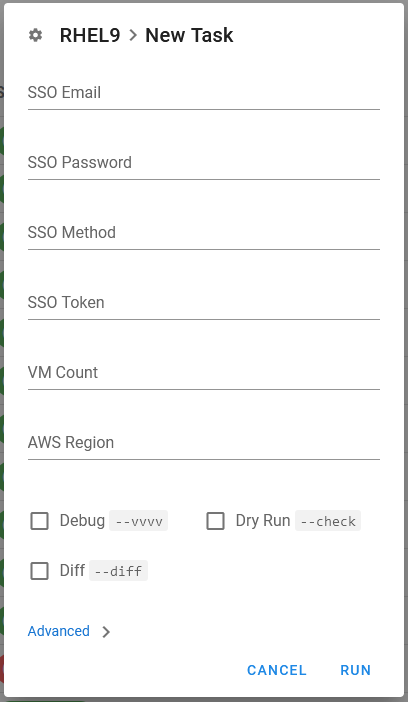
NOTE: Unless you are creating and testing new Tasks, there is no need to check any of the checkboxes at the bottom.
-
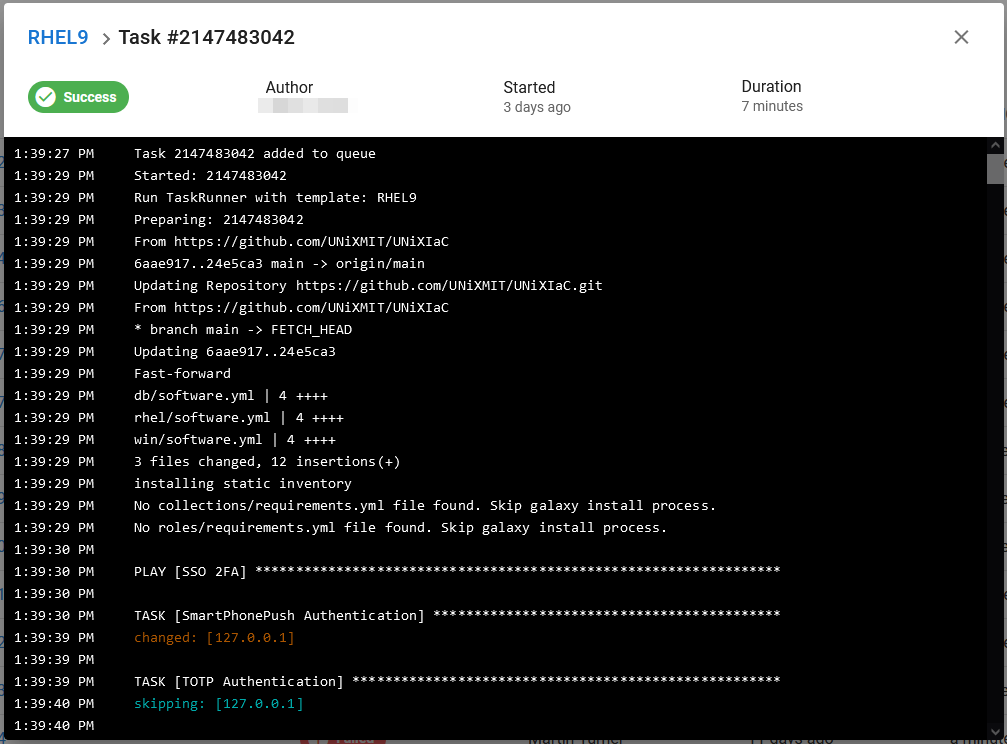
A Task Console window will appear, while the EC2 instance is being created.
You can safely close the browser now or leave it open to monitor its creation. If you want to come back to the task later to check progress, take note of the Task number. When you return, open the Dashboard and click on the ‘History’ tab. The find your Task and click the Task number to re-open the Task console.
- Once the Task has completed and is marked as a ‘Success’, scroll to the very bottom of the Task console, and you will see the EC2 Instance details like public IP/DNS and database connection information.
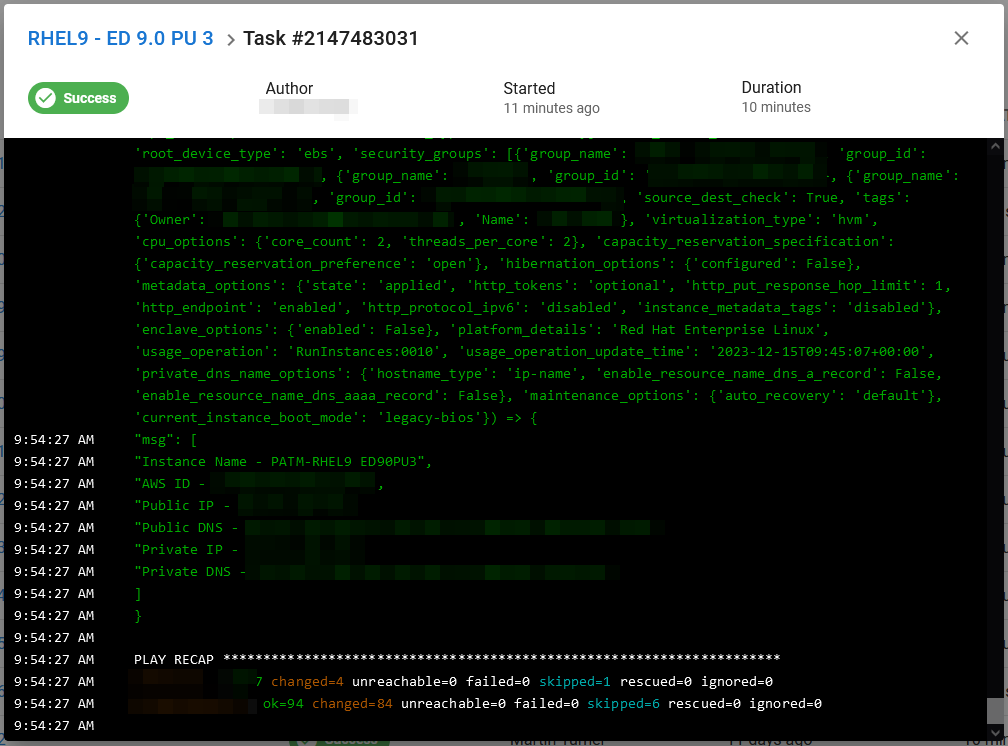
NOTE: If it failed elsewhere in the script, report the issue (including the Task number) to an admin to check the problem.
Additional Details
- Windows EC2 instances are accessible via RDP using the ‘support’ user and the usual password.
- Linux EC2 Instances are accessible via SSH using the ‘support’ user and the usual password.
NOTE: If in doubt, try the usual password or contact an admin.
- The DB tasks create services in Podman containers, running on RHEL EC2 Instances. They are meant for quick deployment of a service for testing, then they can be removed. More information about connection details etc. for services in those containers, can be found at https://unixmit.github.io/UNiXPod
- Instances are created with a 120GB SSD, 2vCPUs, 16GiB Memory and 2.5 GHz Clock Speed (r5a.large).
- Instances are created with your username, OS and products name as Instance name.
- Tags are added to the instance to show what products have been installed and what installers were used.
- Instances are all set to shutdown at 8pm GMT to encourage users not to leave instances running for no reason. If an instance really needs to stay on longer, the auto shutdown can be disabled from either the task scheduler (Windows) or the root cron job (Linux).
Supported OS / Products
Windows Server 2025
- ED/ES 11.0
- AcuCOBOL-GT extend 11.0.0
Windows Server 2022
- ED/ES 6.0, 7.0, 8.0, 9.0 and 10.0
- AcuCOBOL-GT extend 10.4.0, 10.4.1, 10.5.0 and 10.5.1
Windows Server 2019
- ED/ES 5.0
RHEL 9 AMD
- ED 8.0, 9.0, 10.0 and 11.0
- AcuCOBOL-GT extend 10.4.0, 10.4.1, 10.5.0 and 10.5.1
RHEL 9 ARM
- ED 11.0
RHEL 10 AMD
- ED 11.0 (PU 3 +)
- AcuCOBOL-GT extend 11.0.0
RHEL 10 ARM
SLES 15
- ED 9.0 and 10.0
- AcuCOBOL-GT extend 10.4.0, 10.4.1, 10.5.0, 10.5.1 and 11.0.0
Ubuntu 24.04
- ED 11.0
- AcuCOBOL-GT extend 11.0.0
Ubuntu 22.04
- ED 9.0, 10.0 and 11.0
- AcuCOBOL-GT extend 10.4.0, 10.4.1, 10.5.0 and 10.5.1
NOTE: Patch Updates will be added as they become GA.
Licenses
ED/ES and AcuCOBOL-GT extend are all licensed, ready to use.
Security
ED/ES 7.0+ tasks will also install and setup ADLDS (Windows) OpenLDAP (Linux).
The connection details are automatically added into ESCWA using the API.
ADLDS
BASE DN - CN=Micro Focus,CN=Program Data,DC=local
Authorized ID - CN=MFReader,CN=ADAM Users,CN=Micro Focus,CN=Program Data,DC=local
LDAP URL - ldap://localhost:389
OpenLDAP
BASE DN - cn=Micro Focus,dc=secldap,dc=com
Authorized ID - cn=Manager,dc=secldap,dc=com
LDAP URL - ldap://localhost:389
ODBC Drivers/Libraries
- SQL Server ODBC
- Oracle Instant Client ‘Basic’, ‘ODBC’, ‘SQL*Plus’, ‘SDK’ and ‘Precompiler’ packages
- PostgreSQL ODBC
- DB2 ODBC
- MQ Client
VPN
- OpenConnect (Linux)
Databases, etc.
- DB2 11.5 Community Edition
- IBM MQ 9.3
- Informix 14.10 Developer Edition
- MySQL Server 8 Community Edition
- Oracle 23c FREE, 21c XE and 18c XE
- PostgreSQL 16.1
- Redis 7
- SQL Server 2022, 2019 and 2017
- Sybase 16.2
- OpenLDAP for ES
For more information on the connection details etc.
Stopping/Terminating Instances
Semaphore is only for the creation and initial configuration of AWS EC2 Instances. To stop, terminate or re-start instances you need to use the AWS portal.
Troubleshooting
Connection Issues
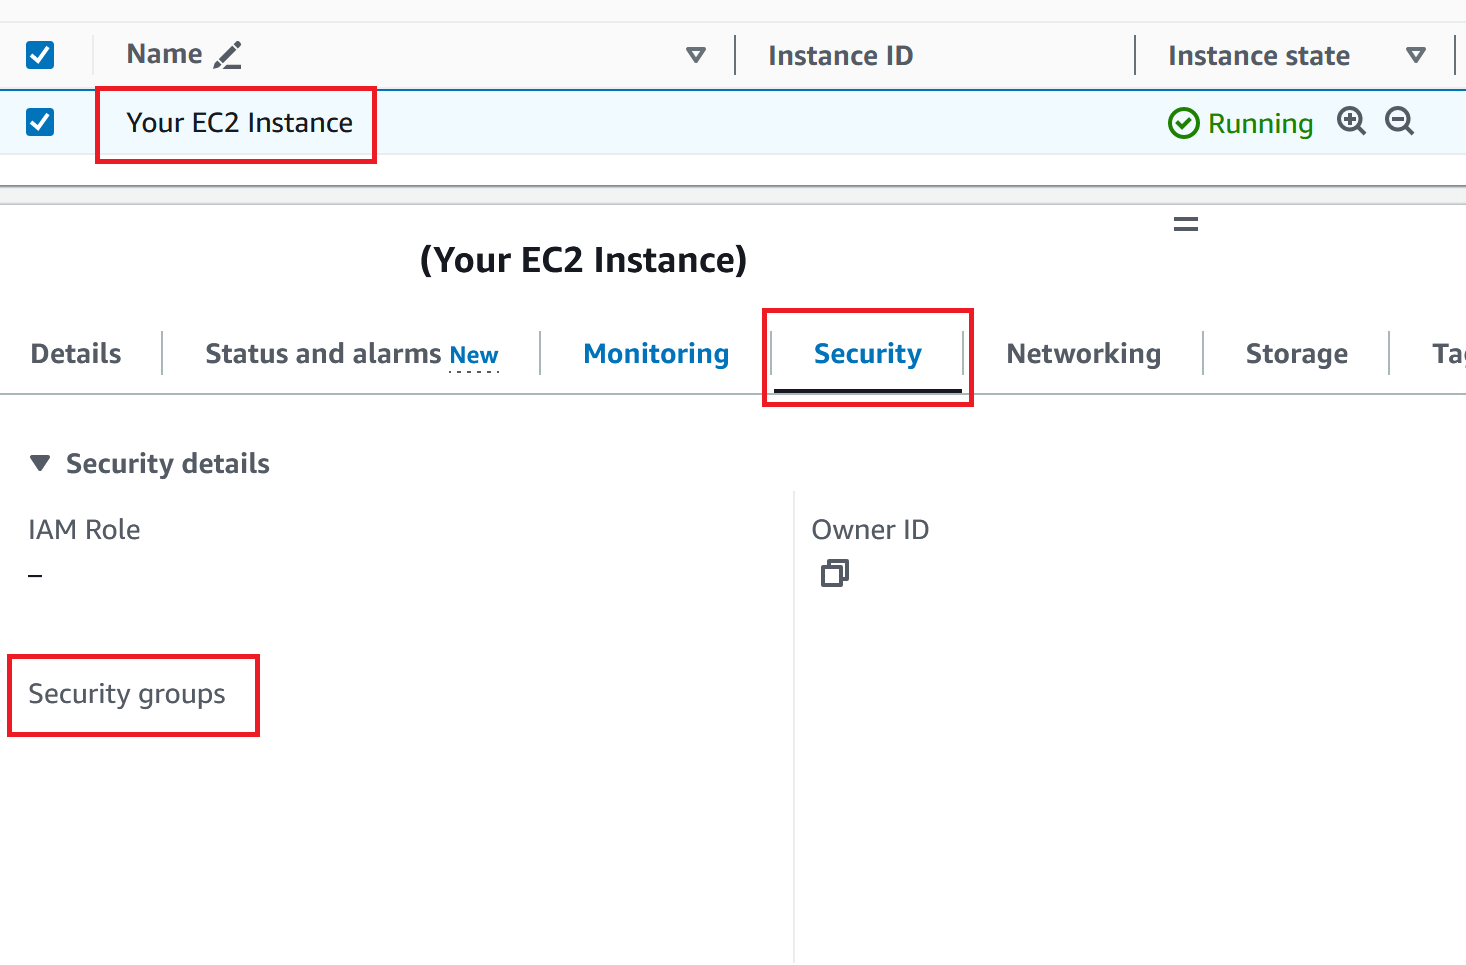
AWS EC2 security groups act as virtual firewalls for your EC2 instances, controlling inbound and outbound traffic. They define which protocols, ports, and IP ranges can access your instances. Adding your external/public IP address allows you to connect to your EC2 instances securely by specifying that only traffic from your specific IP address is permitted, enhancing security by limiting access to trusted sources.
To view the security groups attached to an EC2 instance, you can navigate to the AWS Management Console and follow these steps:
- Go to the EC2 dashboard.
- Select “Instances” from the left-hand navigation pane.
- Choose the EC2 instance you’re interested in.
- Select the “Security” tab in the instance details pane.
- Below the header “Security groups” you’ll see a list of security groups attached to the EC2 instance, along with their names and IDs.
To add your external/public IP address to the security group:
- Click ‘Edit inbound rules’ -> ‘Add rule’.
- Add your external/public IP address (appended with /32), Type ‘All traffic’ and a name for the rule.
- Click ‘Save rules’.

Task fails with error ‘Not authorized for images’
If a task fails with the following error, the AWS EC2 instance AMI number needs updating because Amazon has changed it. Contact an admin to have the AMI updated.
Failed to create new EC2 instance: An error occurred (AuthFailure) when calling the RunInstances operation: Not authorized for images: [ami-0729cb43cbe3dbf3c]